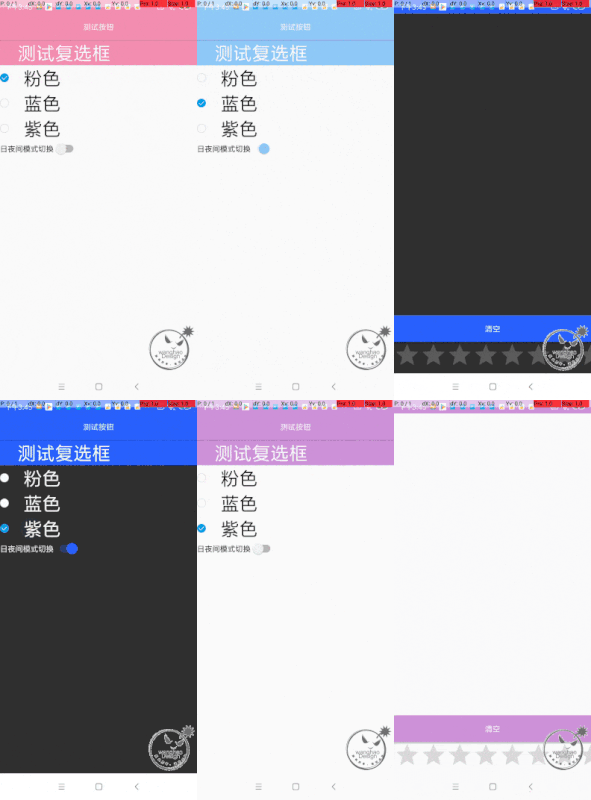
基于前两篇的文章的探究,本次带来的是皮肤切换和日夜间模式切换,以及基于重写部分控件展示Theme的作用;以及对于实际使用时的讲解,踩过的一些坑的汇总
Android Theme切换主题总结
笔者本文讲述在实践换肤以及日夜间模式切换的简单Demo
Android Demo展示讲解
效果展示

由图可以看到,是本示例由多种Theme和夜间模式配合展示效果,并且针对已有的activity也进行变换,这个也是我目前看到的很多已有的博客demo缺失部分,针对已经存在的acitivity如何处理
代码思路展示
- 首先是针对style中的Theme的设置:
<!-- Base application theme. --> <style name="ehiTheme" parent="@style/Theme.AppCompat.DayNight.NoActionBar"> <!-- a.将普通的Theme .AppCompat.Light 替换 .AppCompat.DayNight 用于日夜间模式替换 --> <item name="buttonStyle">@style/ehiButton</item> <!-- b.重写部分控件的样式,修改默认展示的效果 --> <item name="checkboxStyle">@style/ehiCheckBox</item> <!--两者为不同维度 内部按钮 文字等 alertDialogStyle定义内部按钮 定义内部window类似 back等属性 alertDialogTheme--> <item name="alertDialogTheme">@style/AppTheme.blue.AlertDialog</item> <item name="radioButtonStyle">@style/ehiRadioButton</item> </style> <!-- c.重写按钮样式示例展示 --> <style name="ehiButton" parent="@style/Base.Widget.AppCompat.Button"> <item name="android:background">?colorAccent</item> <item name="android:textColor">@color/white</item> <item name="android:textAppearance">@style/Base.TextAppearance.AppCompat.Small</item> </style> - 定义多种Theme
<style name="ehiTheme" parent="@style/Theme.AppCompat.DayNight.NoActionBar"> <!--部分代码省略--> </style> <style name="AppTheme" parent="ehiTheme"> <!-- Customize your theme here. --> <!-- a.定义多种主题Theme前不直接当做父类,而是再次继承一遍,方便在value -v21的更高文件夹中直接利用该 AppTheme 添加新特性,而上面ehiTheme可以统一添加一些共同具有的属性 --> </style> <!--b.定义蓝色主题--> <style name="AppTheme.blue"> <item name="colorPrimary">@color/colorPrimaryBlue</item> <item name="colorPrimaryDark">@color/colorPrimaryBlueDark</item> <item name="colorAccent">@color/colorPrimaryBlueDark</item> <item name="alertDialogTheme">@style/AppTheme.blue.AlertDialog</item> </style> <!--c.定义紫色主题--> <style name="AppTheme.Purple" > <item name="colorPrimary">@color/colorPrimaryPurple</item> <item name="colorPrimaryDark">@color/colorPrimaryPurpleDark</item> <item name="colorAccent">@color/colorPrimaryPurpleDark</item> <item name="alertDialogTheme">@style/AppTheme.Purple.AlertDialog</item> </style> <application android:allowBackup="false" android:icon="@mipmap/ic_launcher" android:label="@string/app_name" android:roundIcon="@mipmap/ic_launcher_round" android:supportsRtl="true" android:name=".DemoApplication" android:theme="@style/AppTheme.blue"></style> <!--application中引用其中一个--> - 针对日夜间模式的资源文件做的调整
- 原有的value文件夹外,再创建values-night
- 创建两份color文件,替换为不同的颜色(ps:需要在夜间模式替换的颜色定义到night文件中即可,其他颜色保留在默认文件夹中即可)
value 文件中的color
      <color name="colorAccent">@color/colorPrimaryBlueDark</color>
    <color name="colorPrimary">@color/colorPrimaryBlue</color>
    <color name="colorBackgroundTrans">#AAFAFAFA</color>

    <color name="colorPrimaryBlue">#bbdefb</color>
    <color name="colorPrimaryBlueDark">#90caf9</color>

     <color name="colorPrimaryPurple">#e1bee7</color>
    <color name="colorPrimaryPurpleDark">#ce93d8</color>
value-night 文件中的color
      <color name="colorAccent">@color/colorPrimaryBlueDark</color>
    <color name="colorPrimary">@color/colorPrimaryBlue</color>
    <color name="colorBackgroundTrans">#AAFAFAFA</color>

   <color name="colorPrimaryBlue">#82b1ff</color>
    <color name="colorPrimaryBlueDark">#2962ff</color>

    <color name="colorPrimaryPurple">#d500f9</color>
    <color name="colorPrimaryPurpleDark">#aa00ff</color>
- 代码中使用多Theme和日夜间模式
- 设定缓存Theme变化后的设置的保存位置 本demo中使用application做为保存,真实项目请使用xml等持久化方式来保存用户设置
public class DemoApplication extends Application {
    private static DemoApplication demoApplication;
   private static final int defaultStyle = R.style.AppTheme_blue;//默认的主题
   private static int tempNightMode = AppCompatDelegate.MODE_NIGHT_NO;//默认日间模式
    private static int style = defaultStyle;
    @Override
    public void onCreate() {
        super.onCreate();
        demoApplication = this;
    }

    //getter 和 setter 方法省略

}
- 设置界面的布局文件
<?xml version="1.0" encoding="utf-8"?>
<LinearLayout xmlns:android="http://schemas.android.com/apk/res/android"
    xmlns:tools="http://schemas.android.com/tools"
    android:layout_width="match_parent"
    android:layout_height="match_parent"
    android:orientation="vertical"
    tools:context=".MDActivity">

    <Button
        android:id="@+id/btn"
        android:layout_width="match_parent"
        android:layout_height="wrap_content"
        android:text="测试按钮" />
    <RadioGroup
        android:id="@+id/rg_theme"
        android:layout_width="match_parent"
        android:layout_height="wrap_content"
        android:orientation="vertical">
          <RadioButton
            android:id="@+id/pink"
            android:layout_width="wrap_content"
            android:layout_height="wrap_content"
            android:text="粉色" />
        <RadioButton
            android:id="@+id/blue"
            android:layout_width="wrap_content"
            android:layout_height="wrap_content"
            android:text="蓝色" />
        <RadioButton
            android:id="@+id/Purple"
            android:layout_width="wrap_content"
            android:layout_height="wrap_content"
            android:text="紫色" />

    </RadioGroup>

    <Switch
        android:id="@+id/switch_day_night"
        android:layout_width="wrap_content"
        android:layout_height="wrap_content"
        android:text="日夜间模式切换"
        android:checked="false"
        />

</LinearLayout>
- 设置界面java代码
public class MDActivity extends AppCompatActivity {
     //控件定义
    private RadioGroup rg;
    private Switch switchDayNight;
    private RadioButton pink;
    private RadioButton blue;
    private RadioButton Purple;

    @Override
    protected void onCreate(Bundle savedInstanceState) {
        //activiy重建后,读取设置后的style
        setTheme(DemoApplication.getStyle());
        super.onCreate(savedInstanceState);
        //activiy重建后,设置界面读取日夜间模式
        if (DemoApplication.getTempNightMode() == AppCompatDelegate.MODE_NIGHT_YES) {
            AppCompatDelegate.setDefaultNightMode(AppCompatDelegate.MODE_NIGHT_YES);
        } else {
            AppCompatDelegate.setDefaultNightMode(AppCompatDelegate.MODE_NIGHT_NO);
        }
        setContentView(R.layout.activity_md);
    initView();
    }
    //初始化视图
     private void initView() {
         //activiy重建后,设置switch开关
        switchDayNight = findViewById(R.id.switch_day_night);
        if (AppCompatDelegate.getDefaultNightMode() == AppCompatDelegate.MODE_NIGHT_YES) {
            switchDayNight.setChecked(true);
        } else {
            switchDayNight.setChecked(false);
        }
        //社会
        switchDayNight.setOnCheckedChangeListener(new CompoundButton.OnCheckedChangeListener() {
            @Override
            public void onCheckedChanged(CompoundButton buttonView, boolean isChecked) {
                if (isChecked) {
                    DemoApplication.setTempNightMode(AppCompatDelegate.MODE_NIGHT_YES);
                    Intent intent = getIntent();
                    intent.addFlags(Intent.FLAG_ACTIVITY_NO_ANIMATION);
                    setResult(RESULT_OK);
                    finish();
                    startActivity(intent);
                    overridePendingTransition(0, 0);
                } else {
                    DemoApplication.setTempNightMode(AppCompatDelegate.MODE_NIGHT_NO);
                    Intent intent = getIntent();
                    intent.addFlags(Intent.FLAG_ACTIVITY_NO_ANIMATION);
                    setResult(RESULT_OK);
                    finish();
                    startActivity(intent);
                    overridePendingTransition(0, 0);
                }
            }
        });
        pink = findViewById(R.id.pink);
        blue = findViewById(R.id.blue);
        Purple = findViewById(R.id.Purple);
        rg = findViewById(R.id.rg_theme);
        setCheck();
        rg.setOnCheckedChangeListener(new RadioGroup.OnCheckedChangeListener() {
            @Override
            public void onCheckedChanged(RadioGroup group, int checkedId) {
                switch (checkedId) {
                    case R.id.pink:
                        setStyle(R.style.AppTheme_Pink);
                        break;
                    case R.id.blue:
                        setStyle(R.style.AppTheme_blue);
                        break;
                    case R.id.Purple:
                        setStyle(R.style.AppTheme_Purple);
                        break;
                    default:
                        setStyle(R.style.AppTheme_blue);
                }


            }
        });
    }
    //设置对应的主题
    private void setCheck() {

        switch (DemoApplication.getStyle()){
            case R.style.AppTheme_Pink:
                pink.setChecked(true);
                break;
            case R.style.AppTheme_blue:
                blue.setChecked(true);
                break;
            case R.style.AppTheme_Purple:
                Purple.setChecked(true);
                break;
            default:
                blue.setChecked(true);
        }
    }
   //将style进行设置,将界面进行重启
    private void setStyle(int appTheme) {
        //相同主题,不进行重启activity
        if (DemoApplication.getStyle() == appTheme) {
            return;
        }
        //缓存用户的主题设置
        DemoApplication.setStyle(appTheme);
        Intent intent = getIntent();
        //设置将activity的转场动画关闭
        intent.addFlags(Intent.FLAG_ACTIVITY_NO_ANIMATION);
        //重启时Result丢失,返回上一个界面
        setResult(RESULT_OK);
        finish();
        startActivity(intent);
        //关闭转场动画
        overridePendingTransition(0, 0);
    }

    public boolean onKeyDown(int keyCode, KeyEvent event) {
        if ((keyCode == KeyEvent.KEYCODE_BACK)) {
            setResult(RESULT_OK);//用于通知上一个界面,重启
            finish();
            return true;
        }
        return super.onKeyDown(keyCode, event);
    }
- 进入设置界面前的界面
public class MainActivity extends AppCompatActivity {
    //设置 setting动作
    private int SETTINGS_ACTION = 1;
    @Override
    protected void onCreate(Bundle savedInstanceState) {
        //读取新的style
        setTheme(DemoApplication.getStyle());
        super.onCreate(savedInstanceState);
        setContentView(R.layout.activity_main);
        initView();
    }
   //用于重新创建已有界面,来展示新的style和日夜间模式
    @Override
    protected void onActivityResult(int requestCode, int resultCode, Intent data) {
        super.onActivityResult(requestCode, resultCode, data);
        if (requestCode == SETTINGS_ACTION && resultCode == RESULT_OK){
            finish();
            Intent intent = getIntent();
            startActivity(intent);
        }
    }
}
- 实现思路
主要的实现思路非常简单:
a. 其实就是由用户选定对应的style和日夜间模式后,关闭动画的情况下,重新启动 设置的activity
b. 返回上一界面时,界面style或日夜间模式有改动就在设置界面
setResult(RESULT_OK);
然后在上一个界面获取,然后重启界面即可
if (requestCode == SETTINGS_ACTION && resultCode == RESULT_OK){
            finish();
            Intent intent = getIntent();
            startActivity(intent);
        }
- 总结
总的来说其实,切换theme主题本身并没有涉及什么很高深的技术,只是对于我们所了解的基础的内容进行一个组合,我们可以用这些很简单知识创建一个更好的用户体验!
- 注意点
- theme当中不要直接引用
  <style name="ehiTheme"
    parent="@style/Theme.AppCompat.DayNight.NoActionBar">
而是应该再次继承一次
<style name="AppTheme" parent="ehiTheme">
-
colors.xml中的颜色无需在 value和value-night全部定义,只需要定义需要在夜间模式要替换的部分对应颜色即可 这样在 ehiTheme用于管理所有android版本下的默认样式, 而AppTheme用于在多个value下定义一些版本的新特性属性
-
日夜间模式和主题的切换针对已经活着的activity是不起作用的,本文采用的思路是直接,无动画重新创建activity,此种方式的劣势 就是需要对app的一些状态进行保存,保证重新创建后用户编辑过的内容不会丢失
-
夜间模式的 color,style之类的只定义需要变化的部分的颜色或者样式,不用把其他日夜间都用的统一样式复制两份,避免不必要的维护成本