一进公司便由于有接触appium的经验,在开发日常android的闲暇之余,开始了对于公司的自动化测试框架的开发,如今一路走来已经开发三个版本,特此对于这一过程进行一个记录。
框架技术一览
- testNG
- appium/seleium
- spring
- logBack
- maven
- luckyFrame(开源项目)
实现功能
- 脚本多机型同时运行
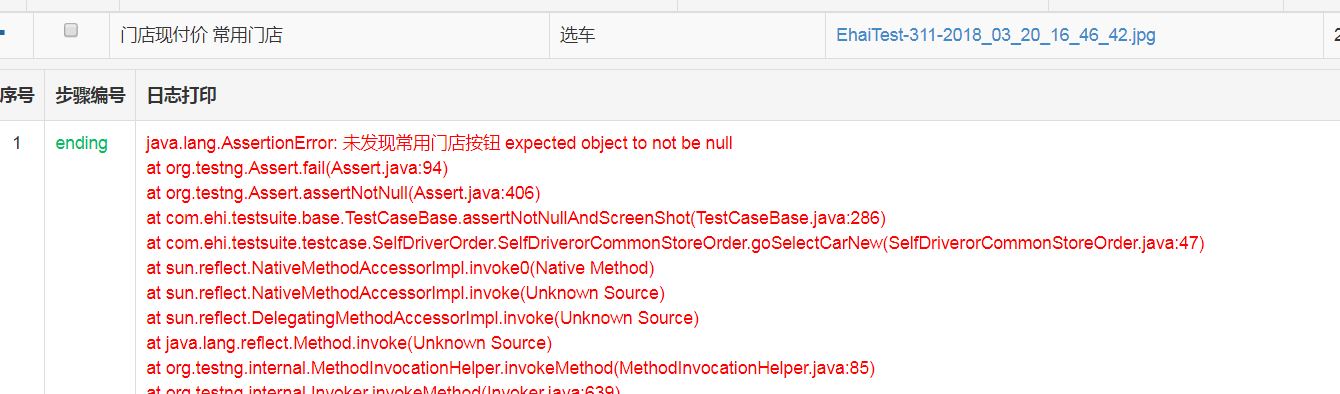
- 报错记录日志,报错截图一并上传服务端查看
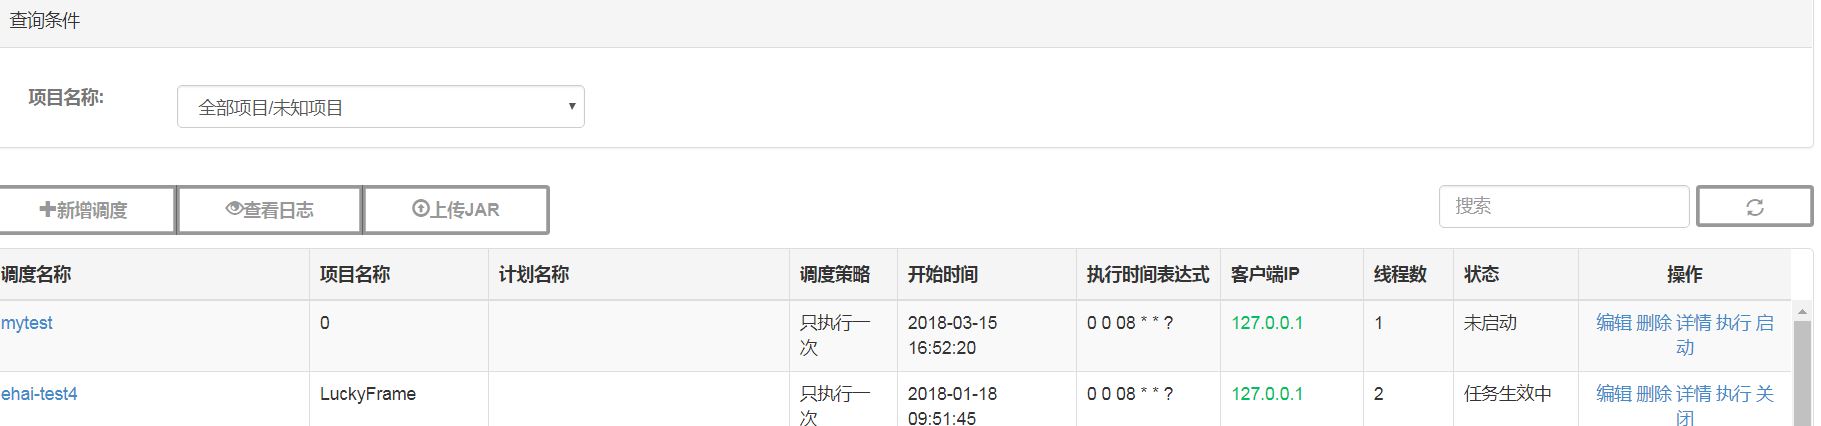
- 测试任务调度配置
- 方法封装
- 静态化配置文件
- 支持参数化测试
- 发邮件通知
框架讲解
框架结构图:
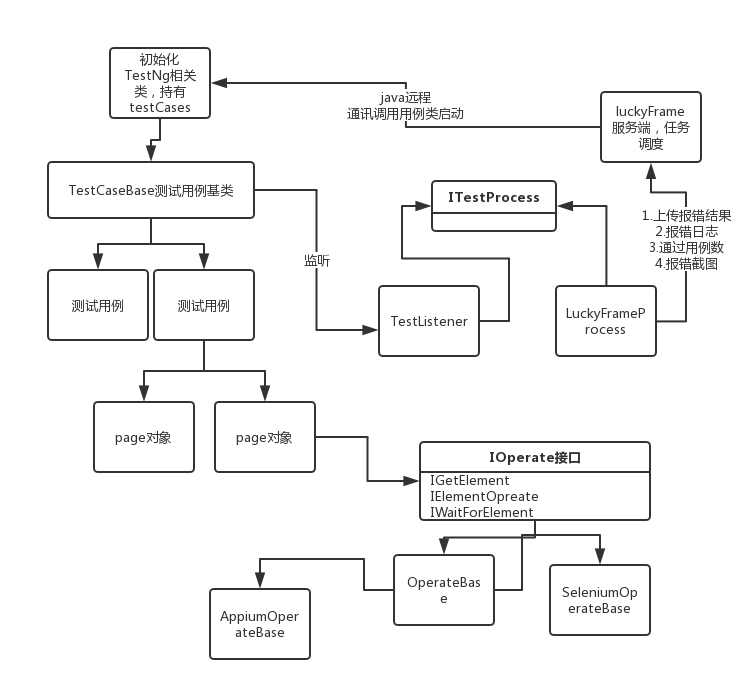
我们使用了一个开源的luckyFrame自动化测试平台,但由于我们在本地曾经实现搭建有一个简易的自动化测试框架,所以我们暂时只是去使用了测试平台的任务调度功能
通过rmi的远程通讯到我们插桩在框架中的client,由client执行commod命令调用我们的初始化TestNg类
public class RunTestNGXML{

	public static void run(TestTaskexcute taskexcute) {
		LogUtil.APP.info("开始Ehai测试");
		int count = taskexcute.getTestJob().getThreadCount();
		List<TestNGConfig> configs = new ArrayList<>();

		for(int i =0;i<count;i++){

			TestNGConfig testNGConfig = new TestNGConfig();
			String taskId = taskexcute.getId()+i+"";

			testNGConfig.setName(taskexcute.getTestJob().getTaskName()+taskId);
			testNGConfig.setTestNGtype(TestNGType.XML);
			testNGConfig.setTestCase(taskexcute.getTestJob().getTestngFile());
			testNGConfig.setProcess(new LuckyFrameProcess());
			Map<String, Object> userData = new HashMap<String, Object>();
			userData.put("taskexcute", taskexcute);
			userData.put("taskId", taskId);

			configs.add(testNGConfig);
		}
		Run.runTestNG(configs);
		LogUtil.APP.info("Ehai测试 ---- 全部结束");
	}


	public static void main(String[] args) {
		try {
			PropertyConfigurator.configure(System.getProperty("user.dir")
					+ "\\config\\log4j.properties");
     		String taskid = args[0];
     		TestTaskexcute task=GetServerAPI.cgetTaskbyid(Integer.valueOf(taskid));
     		if(task.getTestJob().getProjecttype()==2){
     			run(task);
     		}
		} catch (Exception e) {
			LogUtil.APP.error("luckyframeclient启动失败!", e);
		}
	}

}
而在
testNGConfig.setTestNGtype(TestNGType.XML); 获取到的就是在luckyFrame的服务端配置xml文件,通过main方法手动创建多个线程的TestNg实例去执行自动化测试脚本
由配置的脚本的xml
<?xml version="1.0" encoding="UTF-8"?>
<!DOCTYPE suite SYSTEM "http://testng.org/testng-1.0.dtd">
<suite name="Default suite">
	<test verbose="2" name="Default test" preserve-order="true">
		<classes>
			 <class name="com.ehi.testsuite.testcase.LoginCaseForEHai" />

		</classes>
	</test> <!-- Default test -->
</suite>
执行对应的脚本文件,为了兼容我们旧版的小框架的一些app的自动化代码,以及web网页的的代码,对于之前的测试用例基类进行了整理和分类,由框架结构图可以看到我们基类进行了分层
//基础测试基类
public abstract class TestCaseBase{


	@Autowired(required=true)
	protected DriverFactory driverFactory;

	@Autowired
    protected ImageUtils imageUtils;

	protected WebDriver driver;
	/**
	 * 外部数据源
	 */
	@Autowired
	public DataSource dataList;

	protected static Map<String, String> dataPool;

    /*********** 测试用例生命周期部分start  *****************/


	public abstract void onStart() throws Exception;

	public abstract void onBeforeClass();

	public abstract void onAfterClass();

    public abstract IOperate getOperate();

//部分代码省略
}
用于管理接收driver,截图工具类,一些抽象的生命周期方法。
测试用例appium测试基类
public class AppiumCaseBase extends TestCaseBase{

	private static final String DEFALUT_PROPERTIE_PATH = "config/defalutFilePathConfig.properties";
	protected AppiumOperateBase operateBase;

	private static final String in = // 默认输出网页报告位置
	System.getProperty("user.dir") + File.separator + "test-output"
			+ File.separator + "html" + File.separator;

	@Override
	public void onBeforeClass() {
		AppiumDriver<WebElement> driver = (AppiumDriver<WebElement>) driverFactory.getDriver();
		operateBase = new AppiumOperateBase(driver);
	}
    //部分代码省略
}
而根据我们的架构,实际的测试用例只需要继承对于的测试基类,即可开始编写测试用例
@TestClassDescription(value="门店现付价 附近门店订单")
public class SelfDriverorNearByStoreOrder extends SelfDriverOrderBase {
	private SelfDriverPage selfDriverPage;
	private OrderDetailPage orderDetailPage;


	@Override
	@BeforeClass
	public void onBeforeClass() {
		super.onBeforeClass();
		selfDriverPage = new SelfDriverPage(this);
	}

	@DataProvider(name = "doSelfOrder")
	public Object[][] providerBaseData() {
		return getBaseData("一嗨登录自驾附近门店订单测试");
	}
	@Test(dataProvider = "doSelfOrder",description="选车")
	public void goSelectCarNew(BaseData baseData) {
		//取车城市
		SelectCityPage pickCityPage = selfDriverPage.gotoPickCityPage();
		pickCityPage.selectCity(baseData.getData("pickCity"));
		SelectCityPage backCityPage = selfDriverPage.gotoBackCityPage();
		backCityPage.selectCity(baseData.getData("dropCity"));

		SelectStorePage pickStorePage = selfDriverPage.gotoPickStorePage();
		pickStorePage.selectNear("长宁店");
		SelectStorePage backStorePage = selfDriverPage.gotoBackStorePage();
		backStorePage.selectNear("长宁店");
    }
但是,为了保证我们的测试用例的可维护性的进一步提高,避免测试用例的代码过多,我们引入了面向界面编程的思想,要求我们的测试用户,对于操作进行进一步的封装,形成的我们的page对象,由page对象进行对于界面的对应操作
public class MyOrderPage extends PageAppium{
	public static final Log LOG = Log.getLog(MyOrderPage.class);
	/**
	 * 常量页面
	 */
	public static final String MYORDERLABEL = "我的订单";

	/**
	 * 常量id
	 */
	public static final String LL ="com.ehai:id/ll";

	private OrderDetailPage orderDetailPage;

	public MyOrderPage(TestCaseBase ts) {
		super(ts);
	}

	public void doEnterMyOrderPage() {
		LOG.info("进入订单页面");
		operate.waitAuto(By.name(ORDERLABEL));
		operate.clickView(By.name(ORDERLABEL));
		operate.waitAuto(By.name(MYORDERLABEL));
	}
}
但是,这样的程度依旧解决不了代码过多可维护性不够的问题,并且对于appium的本身的东西封装也不是很够,一旦发生改版,方法废弃都可能引起我们在框架升级时的许多巨大问题。于是我们引入了下一层的封装IOperate
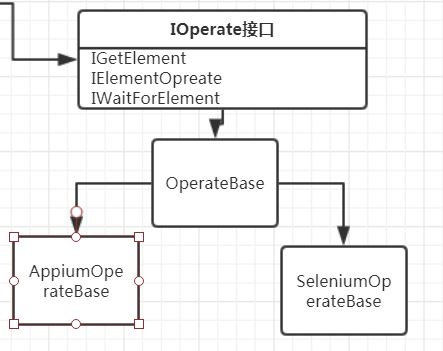
我们封装为一些共用的基础操作,以及移动端特有的操作和服务器端特有的操作,并且用接口隔离开,由page对象操作我们基本的操作类接口,减少框架本身对于我们的影响
//部分实现代码
public abstract class OperateBase implements IOperate{
	protected WebDriver driver;
	public OperateBase(WebDriver driver) {
		this.driver = driver;
	}

	@Override
	public WebElement getElement(String by) {
		if(StringUtils.isEmpty(by))
			return null;


		if(by.startsWith("/")){
			return getElement(By.xpath(by));
		}

		if(isAndroid()){
			if(by.contains(":id/")){
				return getElement(By.id(by));
			}else{
				return toAndroidDriver().findElementByAndroidUIAutomator("text(\""+by+"\")");
			}
		}
		return null;
	}
}
而框架本身提供的却并不只有这一部分的内容,我们还提供了监控机制,和报错后对于错误的推断还原功能,对于报错情况的一个汇总情况的反馈机制,将日志和未通过用例还有截图都返回给LukyFrame


我们先定义一个testNg的监听器类,处理所有种类的监听
public class TestListener implements IInvokedMethodListener,ISuiteListener,ITestListener,IReporter{
	//测试过程处理,尽量放在子线程中处理,防止卡死测试流程
	private ITestProcess testProcess;
	 //部分代码已忽略
	 public TestListener(ITestProcess testProcess){
		this.testProcess = testProcess;
	}
	@Override
	public void generateReport(List<XmlSuite> xmlSuites, List<ISuite> suites, String outputDirectory) {
		testProcess.generateReport(xmlSuites, suites, outputDirectory);
	}
}
然后,我们自定义一个对外的 ITestProcess接口类,将这个传入刚刚的TestListener之中,将监听器获取到的数据通过我们自定义的接口类发放出去,然后自定义一个包含luckyFrame内容的实现类,将内容进行回传到线上,保证隔绝开来,未来不使用luckyFrame也能自由使用替换其他测试平台
public interface ITestProcess {
    //部分代码已忽略
	void beforeRun(TestNGConfig config);
	void beforeStart(ISuite suite,DriverFactory driverFactory);
	void afterFinish(ISuite suite,DriverFactory driverFactory);
}
public class TestProcessAdapter implements ITestProcess{
      //部分代码已忽略
	@Override
	public void beforeStart(ISuite suite, DriverFactory driverFactory) {}
	@Override
	public void beforeRun(TestNGConfig config) {}
}
//部分代码已忽略
public class LuckyFrameProcess extends TestProcessAdapter{
	private TestNGConfig config;
	private TestTaskexcute taskexcute;
	private String taskId;

	private void uploadScreemShot(String url) {
		Map<String,Object> map = new HashMap<>();
		LogOperation caseLog = new LogOperation();
		for(Map.Entry<String, String> entry : shotFileMap.entrySet()){
			String filePath = entry.getValue();
			File file = FileUtils.getFile(filePath);
			String time = DateUtil.format(new Date(), "yyyy_MM_dd_HH_mm_ss");
			String imgname = Thread.currentThread().getName()+"-"+time+"."+FilenameUtils.getExtension(file.getName());
			String result = HttpClientHelper.httpClientPostFile(url, file, imgname, map, "utf-8");
			if(result.equals("success")){
				LogUtil.APP.info(file.getName()+"---------上传成功");

				//测试方法报错才能显示到界面上
				if(methodMap.get(entry.getKey()) == null)
					continue;
				caseLog.UpdateCaseDetail(methodMap.get(entry.getKey()), null, imgname);
			}else{
				LogUtil.APP.info(file.getName()+"---------上传失败");
			}
		}
	}
PS:luckyFrame本身不带图片上传,以及打印手机日志功能;属于我们的客户化开发功能
踩过的坑
- 查找元素的代码封装,旧版的元素查找五花八门且调用时浪费时间
/**
	 * 通过id获取组件文字
	 */
	public String getText(String id) {
		return driver.findElement(By.id(id)).getText();
	}

	/**
	 * 通过xpath获取组件文字
	 */
	public String getTextByXpath(String String) {
		return driver.findElement(By.xpath(String)).getText();
	}
由代码可以看到,用户需要自己判断使用哪种方式查找,方便程度和原生毫无差别
优化后,将string类型的统一处理,只用一个方法,自动判断xpath,id之类的string文本
@Override
	public WebElement getElement(String by) {
		if(StringUtils.isEmpty(by))
			return null;


		if(by.startsWith("/")){
			return getElement(By.xpath(by));
		}

		if(isAndroid()){
			if(by.contains(":id/")){
				return getElement(By.id(by));
			}else{
				return toAndroidDriver().findElementByAndroidUIAutomator("text(\""+by+"\")");
			}
		}
		return null;
	}
多种条件下出现不同的元素的判断,旧版元素等待代码
/**
  * 显示等待,等待Id对应的控件出现time秒,一出现马上返回,time秒不出现也返回 默认等待20秒
  */
	public WebElement waitAuto(By by, int time) {
		WebElement webElement = null;
		try {
			WebDriverWait wait = new WebDriverWait(driver, time);
			webElement = wait.until(ExpectedConditions.elementToBeClickable(by));
		} catch (Throwable e) {
			imageUtils.screenshotDefault("页面出现超时" + Util.getCurrentDateTime());
			throw e;
		}
		return webElement;
	}
新版实现,可以判断多种元素在不同情况下的出现,并进行相应的处理(需要贴调用实现类)
**
	 * 判断多个元素,等待其中某一个元素出现
	 * @Description:TODO
	 * @param bys
	 * @param time
	 * @param needShot
	 * Integer 具体的某一个元素索引,-1 没有任何元素出现
	 */
	public Integer waitOneElementShow(List<By> bys,int time,boolean needShot){
		List<ExpectedCondition<WebElement>> conditions = new ArrayList<>();
		for(By by : bys){
			conditions.add(ExpectedConditions.elementToBeClickable(filterByName(by)));
		}
		ExpectedCondition<Integer> condition = new ExpectedCondition<Integer>() {
			@Override
			public Integer apply(WebDriver driver) {
				RuntimeException lastException = null;
				for (int i = 0; i < conditions.size(); i++) {
					ExpectedCondition<WebElement> condition = conditions.get(i);
					try {
						WebElement el = condition.apply(driver);
						if (el != null) {
//							LOG.info(condition.toString());
							return i;
						}
					} catch (RuntimeException e) {
//						LOG.error(e.getMessage());
						lastException = e;
					}
				}
				if (lastException != null) {
					throw lastException;
				}
				return -1;
			}

			@Override
			public String toString() {
				StringBuilder message = new StringBuilder("at least one condition to be valid: ");
				Joiner.on(" || ").appendTo(message, conditions);
				return message.toString();
			}
		};
		return waitCondition(condition, time, needShot);
	}
-
appium 和 seleium 共同使用时会出现类型转换错误,解决方法是保证appium和seleium的maven依赖一致
-
adb启动报错
could not read ok from ADB Server
原因:adb 5037端口被占用(常被360占用!!) cmd输入:netstat -aon|findstr 5037,然后在任务管理器中干掉对应的进程,重启adb即可
- appium的UiAutomator2-driver可以捕获到Toast,但UiAutomator2只支持Android5.0+
[UiAutomator2] Error: UIAutomation2 is only supported since Android 5.0 (Lollipop).
You could still use other supported backends in order to automate older Android versions.
即将实现的功能
- 自动切换wifi
- 对接jekins,进行定期打包冒烟测试